

Arcetri VPN access
It is possible to connect to the Arcetri LAN by using a VPN.
A VPN (Virtual Private Network) is a network software, server and client, that allows any authorized user to access a remote network as if he/she was locally connected. In the specific case of Arcetri, a computer that is connected by VPN will behave as if the remote computer was connected through a wifi access point, so it will not get an IP number of the Arcetri LAN but a number in a protected network. The software, then, will route the traffic to and from the LAN.
All the other network traffic, so not going to or coming from Arcetri, will follow the normal route through your home router and you will need to pay attention as usual to protect your PC as the Arcetri firewall protects only the traffic coming from the Arcetri LAN
The advantage of using the VPN is that you will be able to connect with ssh to every computer in the LAN without using tunnels. The same is for copying files, accessing protected web resources etc.
To access the Arcetri VPN, users will need to install the client in their own remote laptop or desktop and import the configuration file that we provide here for download. The access is then granted by using the same name.surname and password used to access the INAF personal mailbox and other services.
Most of the client software allow the user to save the password. Please DO NOT SAVE the password on your remote PC! Please take this instruction very seriuosly. It is your own password, needed to access all your INAF data, and if you loosed the laptop or it was stolen, you would allow anyone to access your data and our LAN.
Should we know of someone who have saved the password on the personal PC, we shall be forced to quit the service for everyone, so be responsible
Below you find specific info about downloading the client and installing it
Windows/Mac
The software for these two OSs has the same interface so the instructions below are the same for both
- Download the installer from this page: https://openvpn.net/vpn-client/ — Choose OpenVPN Connect client for macOS or Windows
- Request your personal configuration file by sending an email to Questo indirizzo email è protetto dagli spambots. È necessario abilitare JavaScript per vederlo.
- Install the OpenVPN Connect app in the usual way and launch the app. The Windows installer will ask you to choose between TAP driver and Wintun driver. Select Wintun
- At the first run, if the client asks to add a new connection follow the instructions. otherwise click on the “+” icon to get to this box
- Choose the “FILE” tab in the window, as shown below
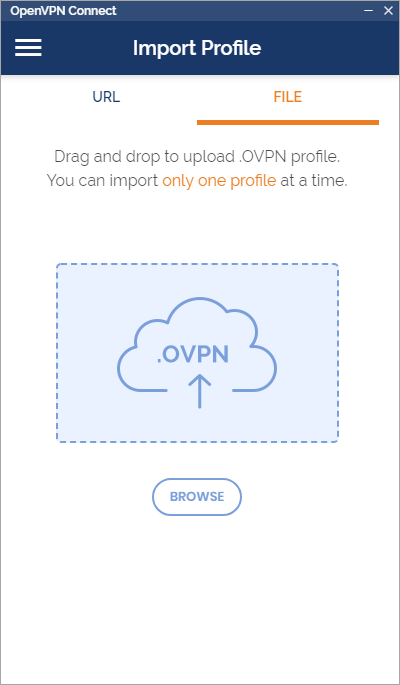
- Import the .ovpn profile that you asked for at point 2., by either drag-and-dropping it or by browsing your filesystem
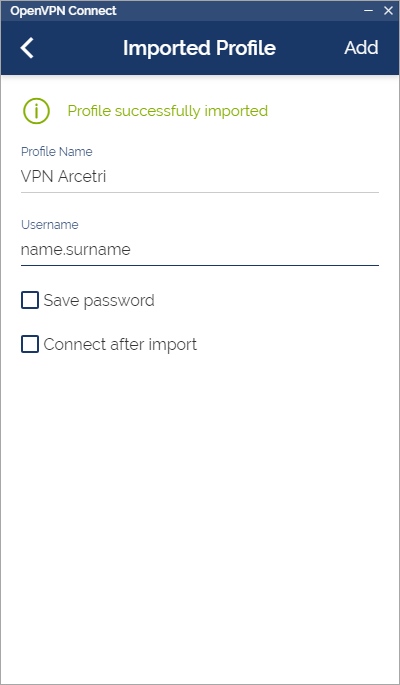
- Once the profile is imported (figure below) you have the chance to change the name of the connection to something more user friendly (e.g. VPN Arcetri)
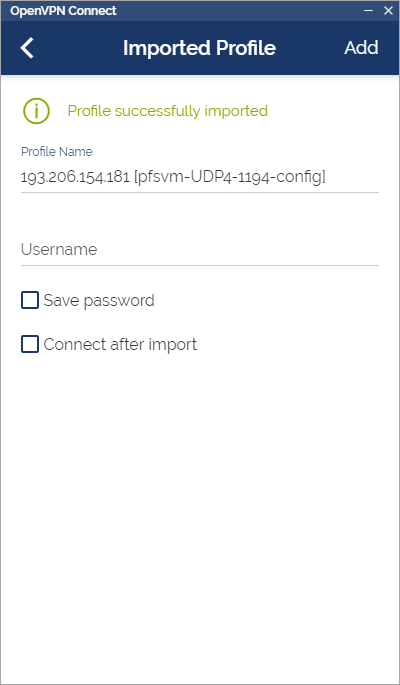
- Fill in the username, which is your name.surname in your inaf.it email account
- Do NOT tick the “Save password” option: this is the password for your INAF account and should not be stored!
- Click on “Add”
- Choose the “FILE” tab in the window, as shown below
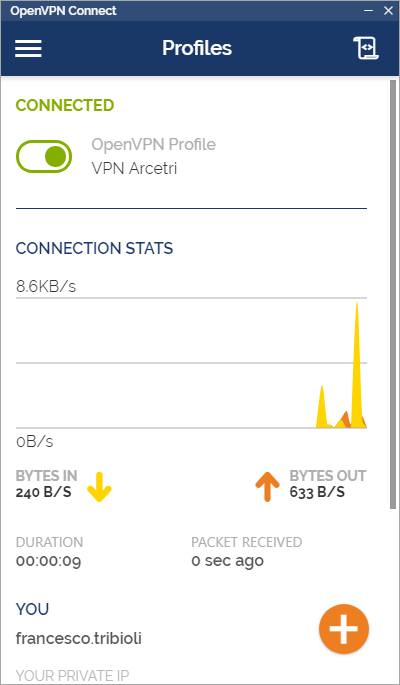
- Back on the main window, you will see your connection listed, with a switch to activate it. If you turn it on, the app will prompt you for the password of your INAF credentials (do not save it!). Upon successful authentication, the VPN connection is started and you will see a window like the one in the figure below, displaying some info on the connection and its stats.
Linux
To connect using the command line
- Install the OpenVPN following the instructions you will find here: https://community.openvpn.net/openvpn/wiki/OpenVPN3Linux
- Request your personal configuration file by sending an email to Questo indirizzo email è protetto dagli spambots. È necessario abilitare JavaScript per vederlo.
- Start in a terminal the vpn with the command:
openvpn3 session-start --config fullpathFile
(where fullpathFile is the full path of the file you asked for at point 2 e.g. /home/tizio/VPN/pfsvm-UDP4-1194-config.ovpn ) - The prompt will ask for your Auth User name: (which is your name.surname in your inaf.it email account) and password. If everything is correct the terminal should print "Connected"
- You can check the VPN status with the commands:
openvpn3 sessions-list
openvpn3 session-stats --config fullpathFile - You can disconnect with the command:
openvpn3 session-manage --disconnect --config fullpathFile - To simplify the use, you might create a couple of shell command aliases like:
- tchs/chs in the file .tcshrc/.cshrc in your home directory
alias vpn-on 'openvpn3 session-start --config fullpathFile'
alias vpn-off 'openvpn3 session-manage --disconnect --config fullpathFile' - bash/sh in the file .bashrc/.profile in your home directory
alias vpn-on='openvpn3 session-start --config fullpathFile'
alias vpn-off='openvpn3 session-manage --disconnect --config fullpathFile'
- tchs/chs in the file .tcshrc/.cshrc in your home directory
To connect using the Network Manager
It is possible to connect by using the Network Manager too. Then the VPN will appear among the network choices when you click over the network icon on the right top of your desktop.
Unfortunately different versions of Linux show different Network Manager screens so we will not provide here screenshots as before. In any case, you will need to have some additional software packets installed. Their name changes with the Linux distribution. You will need the Network Manager itself, which should come installed by default, and the the OpenVPN plugins for it. For some distributions you will need to install network-manager-openvpn, for RedHat and CentOS you will need NetworkManager-openvpn, NetworkManager-vpnc and NetworkManager-vpnc-gnome.
In all distributions you will have to import the provided configuration file and you will get to a box where your username and password will be asked. Again you must choose the option to ask the password every time. In some distribution there is a specific button to chose this option from a list, while in RedHat and CentOS the option appears by clicking a small icon inside the box where you may enter the password.
By default this option is set to save the password, so if you are not sure to have changed it, PLEASE use the command line version or ask the IT crew for more info.

